Saturday, November 26, 2011

A New Digital Process!

With the prospect of some important jobs coming up, I thought I'd better explore what options are out there in terms of modern processing of raw files.

Now when using a digital SLR, there are essentially two options for shooting: raw and jpeg. Raw, as the name would suggest, captures the raw data from the sensor. When shooting in jpg, the camera processes the raw image, compressing the image and shedding the raw data in the process. For those who demand full control of their images, raw is the suggested method with the shooter then using a software package to process that image.

Until now I had been using an old software package to process my raw images before exporting them as jpgs and then editing them in Photoshop; a rather drawn out and time consuming process!

With my interest in photography lagging for a number of years, I didn't take much interest in the advancements of  processing technology, so when I came back to it earlier this year, I resumed with my old ways.

But as I again became involved in the photographic community I began to notice how image quality had greatly improved, whether from the amateur or pro. So, I thought I'd better investigate!

From what I read the options were either Adobe's Lightroom or Apple's Apeture; the latter though requiring a Mac (from my brief reading). So Lightroom was the first port of call and as quickly as possible a trial version was loaded and ready to go. And after only a few minutes I was sold - and at the same time absolutley kicking myself for not trialling it sooner!

Here's a few comparisons from the shoot with the Turtons (all which, I might add have been reprocessed!)


(I might add that not every photos is a direct match, I wasn't about to go back to the old ways to process the exact matches)

And best of all, it is unbelievably fast to work through a shoot and end up with higher quality at the end!

What are others using these days?

Sunday, November 20, 2011

Sun: Friend and Foe!

All to often I see happy snaps ruined by harsh, bright sunlight. Sometimes this mightn't matter too much; it may be one of hundreds of photos of that family member or friend. Sometimes though it might be a rare photo of a loved one or of a never repeated special moment; a photo that you want to be able to look back on with fond memories.

Now I know that in a past blog I briefly explored the idea of what makes a memorable image, and that the important thing is the memories that it brings back. To this end though there is a limit; sometimes a photo can be that bad that it simply isn't evern worth saving (or printing if your're still using film).

So how can we make the most of the least ideal conditions? What are ideal conditions and what are least ideal conditions?

Ask any photographer and they'll probably tell you their favourite times to shoot outdoors are the first couple of hours of the day and the last few hours. During these times (coined the "golden hours"), when the sun is low in the, sky the light is normally much softer (due to the increased depth of atmosphere through which the light must pass) and much warmer. And, with the sun low in the sky, it is also easier to work with.

But we're not always presented with opportunities at either end of the day; most outdoor family events are over lunch, we go down to the park with our kids either late morning or early afternoon, so we must adapt to these harsh lighting conditions and make the most of them.

First trick, and probably the most obvious, is seek out the shade!

Eliza (from An Arvo with the Turtons).
There is no use of artificial light or
reflectors in this shot, just expose for
the subject and let the background blow
out.
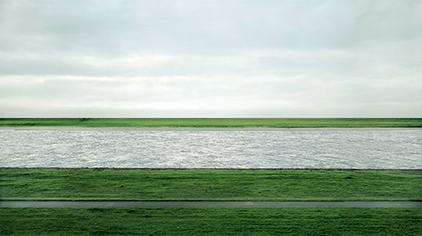
Shade, although much darker, provides a far more even quality of light. And with even light comes soft shadows and smooth exposures. Now "shadow" might extend to waiting for a cloud to block the sun (as with the photo left) and, depending on the extent of the shadow, bright sunlight from surrounding areas can still spill enough light in to keep your exposure up and provide a bit of interest.

Failing overcast conditions, or at least a cooperative cloud or two, then the shade from structures or trees is the next best thing, but be warned that things can get quite dark. To combat this you might want to use a bit of fill flash to just help boost the ambient light levels.

If you're confident with controlling your exposure then the soft dappled light found under the bigger trees can be very pleasant; just make sure you expose on the slightly darker side to avoid blowing out the lighter areas and ending up with brutal white splurges on your subject.

Shade not an option? Well if you're forced to shoot in full sun the first goal should be to avoid full sun on the face of your subject. This is especially true when the sun is high in the sky and will cast deep shadows around the eyes, under the nose and under the cheeks.

Try to get the sun behind your subject and expose for the face. You might end up with blown out rim lighting, but one hopes that you'll still get a half decent exposure on their face.
An excellent use of a reflector to bounce
light back onto the subject by Wagga
Photographer Belinda Fraser 

This situation can be improved by 'bouncing' light back into your subject. To achieve this photographers use refelctors - essentially a large, rigid sheet of aluminium either silver or gold - to bounce light back into the subject and in doing so balancing out the light from the sun and the light on the subject.

Reflectors are a pretty cheap bit of gear with a 3/4 length 5-in-1 reflector (silver, gold, white, translucent and black - the last being for soaking up light) available for around $100 and a bit cheaper on line. It is definitely a very useful bit of gear if you're shooting people and outdoor subjects.

But if you can't access one, or don't think it's worth the outlay, then look for bright reflective (but muted) surfaces and position your subject in such a way that the sunlight bounces back onto them from the reflective surface.

Finally, for the more advanced there is the option of strong artificial light (dedicated speedlight either on or off camera). This will act either as a primary light source or at least a very close secondary light source to the sun.

To use a speedlight effectively you're going to need something with a bit of oomph, after all it will be competing with the sun! So it pays to get a good brand and invest in good batteries! With the speedlight on the camera your creativity is limited, but if you get yourself an off-camera shoe chord that will really start to free you up with regard to creativity and quality. If you want to go that bit extra (and have the required deep pockets) then the ultimate is a set of radio triggers.

Radio triggers can be used to trigger speedlights, strobes (and even cameras) remotely and with some brands as far away as 400m. With these in your armament very quickly your only limit becomes your own imagination. A set of good radio triggers (and I emphasise good - last thing you want is unreliable triggers) will cost you up around $350-$500 depending on brand and retailer.

My lovely sisters-in-law Kristy (L) and Jo (R).
Sun is fairly low in the sky (3pm) over their left
shoulder. Speedligh is slightly off to the left of camera.
An off-camera shoe chord was used to free up
the speedlight.

A more creative use of off-camer flash.
As you can see the sun is behind and to the
left of Kristy while the flash is high and to her
right. An off-camera shoe chord was used to free up
the speedlight. 

An example of the creativity the freedom of radio triggers provides.
The speedlight is high and to my right and is exposed just under the
sun. The sunlight provides great rim lighting while a bit of post-processing
provides the cooler tone and strong contrast.

So there you go; hopefully you have got something out of this post and will see an improvement in your photography.

For more photos don't forget to check out my gallery and be sure to 'Like' my facebook page to keep up to date with these blogs and my work!

Monday, November 14, 2011

Talk About the Money Shot!

Well,  a new record price for a photograph at auction has been set in New York with the sale of Andreas Gursky's Rhein II going for a whopping $4.3 million...
And it's not even a one off print!

I have nothing further to say...

Sunday, November 13, 2011

An Arvo With the Turtons

Answering my call for test subjects was Monique and her two lovely daughters, Molly and Eliza.

Both girls have a great sense of humour and kept the whole afternoon entertaining with their laughter and wisecracks (usually at my expense!).

Here's a few that I've managed to process tonight...


Thursday, November 10, 2011

How to Shoot Lightning


Lightning in the hills West of Wagga Wagga 9/11/2011

So last night we had a half decent light show; the first of the season however fleeting it was. And while I was standing out on the side of the road, swatting the occasional mozzy and listening to the rolling waves of thunder, a comment from another weather enthusiast was on my mind: "I wish I knew how to photograph lightning..."

Well, what an excellent topic for a blog!

The thing about lightning is that it happens quickly, damn quickly. Occasionally you'll be lucky to get a storm that produces pulsating lightning (where the bolt travels from the cloud to the ground a number of times) and when this happens you almost have a shot at reacting fast enough to capture it just as you would any other scene.

But these are rare occurences and certainly in my time it has not happened more than once or twice. So we need other methods to try and capture these fleeting demonstrations of Mother Nature's power.

Essentially there are two methods: a lightning trigger and long exposures (you can read about exposures here).

Lightning triggers - and I won't go into the electronics because I wouldn't have the foggiest - work by sensing the pulse of light and relaying a signal to the camera. These are almost essential for capturing lightning during bright daylight conditions (the above photo, although it appears to be during the day, was a 15s exposure. So the scene, to the naked eye was actually quite dark) unless you are willing to fire away like a machine gunner under attack and hope that you catch one by fluke. Now for most people (including myself) a lightning trigger, which can set you back as much as $400, is simply not worth the few occasions a year you might actually get a chance to use it. That leaves us with long exposures...

Lightning over Coolamon - luck of the Irish!
For a long exposure to work (and I'm probably suggesting anything over 5 seconds, depending on how frequent the lightning is) it needs to be fairly dark. Of course you could stop down your appeture, thereby restricting the amount of light that gets through, but this will really limit you to close up lightning; probably too close for comfort! Ideally you want to be working with appetures f/8 and under.

In terms of exposure, you want to start thinking about trying to get 5s or longer. Once it gets really dark - as in during the night - if you want any chance of capturing a bit of detail in the foreground or  the clouds you're also going to need to start looking at exposures longer than 30s. For this you will need a camera that has a "bulb" option for the shutter. This allows you to hold open the shutter indefinitely. Of course you won't be able to physically hold down the shutter button indefinitely, so to overcome this problem you need to get yourself a suitable remote. This can be anywhere from $10 for a grey import through to a couple of hundred for a genuine fully featured remote. This will also solve blur issues of handling your camera while the shutter is open.

Now with long exposures comes the need for a solid rest for your camera; a tripod is an absolute must. You can pick up a great one for under $200 and for anyone serious about photography, they're simply priceless.

The toughest part of all this (not an issue during the day) is focusing. I've had many a rip-snorting lightning strike ruined because I hadn't yet got the focusing spot-on. Of course your best bet is to hope that there are some lights on which to focus at about the same distance from you as the lightning, but in the rural and regional areas this can be pretty tough to find. If you don't have any lights or objects on which to focus, you can try focusing to infinity (a symbol like an 8 on its side) and then bringing the focus back just a tad, taking a photo and checking it out (again, the beauty of digital!) before adjusting it and repeating.

One little trick is to - during the day - grab your lens and a whiteout pen and make some very small marks on the barrel of the lens and the focus ring (if you have a lens with no markings and making sure you don't gum up the lens) at varying distances. The distances vary from person to person and personally I have just one that corresponds to lightning ~40km away on my common landscape lens. You can then use that during the night to arrive at the correct focus sooner, minimising the number of superb strikes that you miss out on while getting the focus right.

So that is pretty much it; all you have to do now is wait patiently for a storm in the right spot, at the right distance and without rain effecting you to give it a go - and that happens all the time doesn't it?!

One quick note on safety though: lightning is deadly and unpredictable. A bolt can strike tens of kilometres ahead of, to the sides or rear of a thunderstorm. There are no real rules for lightning, it will hit high points, it will hit low points and it can just as easily hit you if you're too close. Keep in mind too that you will probably be running around with a long metal pole (your tripod) so just keep your distance and don't be afraid to pull back if you think it's getting too close.

Be prepared for disappointment: in a small version this
doesn't look too bad, but unfortunately the focus is way
out, ruining an otherwise terrific lightning shot!


Wednesday, November 9, 2011

Expose Yourself!

Ever wanted to get that little bit more oomph out of your shots, to get rid of those bleached highlights or murky shadows? Chances are its the exposure letting you down. So grab your camera, read on and be prepared to expose yourself!

Expsoure is the coming together of two wonderful things: shutter speed and appeture. Oh and a  third, minor hanger-on'er: ISO. What are these mysterious terms I hear you ask? Well, here it is broken down really quick...

The shutter is the click we here when we hit the shutter button; it is essentially how long the camera "sees" for. The faster the shutter speed the less light that enters the camera, the longer the more light. Why is this important? Well if you want to capture something like the movement of the ocean or the blinding strike of lightning then you need a loooong shutter speed. If you want to capture something that might happen in the blink of an eye or is moving really fast like a droplet of milk frozen mid air (it's far more beautiful than it sounds!) or the plume of a smoke stream then you need a really fast shutter speed to freeze the action. The shutter speed is measured in whole or fractions of a second eg 30s, 1/30s, 1/4000s, etc.

The appeture essentially mirrors the role that your iris (the coloured bit of your eye) plays in controlling the size of your pupil. The larger the appeture the more light is allowed through and logically the smaller, the less light. The appeture must be balanced with the shutter to allow for the correct exposure and there's a number of combinations that will result in a good exposure. Just as with the shutter, the appeture has an effect on the image: the larger the appeture the shallower the depth of field (ie less of the image is in focus), the smaller the appeture the deeper the depth of field (ie more of the image is in focus). Appeture is measured or referred to by the "f stop" number and just to confuse you a bit more, the smaller the number the bigger the appeture: f/1.8 (big hole), f/32 (small hole).

And a quick mention of ISO: this is the sensitivity of the sensor in your digital camera (or film in your coal fired, steam powered film camera!). The lower the number the less sensitive the sensor or film and the finer the quality of the image. The higher the number the more sensitive and the noisier or grainier the image.

Really that is it in a nutshell. There's probably just a couple more tips that might come in handy:

  • A slow shutter speed will capture movement in a scene, but it will also capture movement of the camera itself. If you want to slow it down, make sure you have a steady rest like a tripod.
  • If you read or hear about "stops" that is referring to, I guess what you could call a unit of exposure. One stop is the doubling (or halving) of either the shutter speed or appeture. If you have an exposure of 1/60s @ f/8 and you increase the exposure by a stop you end up with either 1/30s @ f/8 (careful of camer-shake!) or 1/60s @ f/4
  • If you want to play around with trying to capture lightning or star trails (both of which usually requiring exposure in excess of 30s) then you're going to need a camera with a "bulb" function. This allows you to hold open the shutter indefinitely (well as long as your batteries will last) and unless you want to test out the stamina of your index finger, you'll also need some sort of remote.
  • If you can't adjust the appeture and shutter speed on your camera (and with many point and shoot style cameras you can't) you can still control the overall exposure by utilising exposure compensation. This allows you to increase or decrease the exposure in set increments. The classic example of where this can be very useful is where you're taking a photo of someone against a really dark background and your first image comes out with the person really, really light; washed out and without detail. The exposure compensation allows you to force the camera to reduce the exposure, thereby getting a nicely exposed image of your BFF!

From here my suggestion is to play around and experiment with whatever settings you have available. After all that is one of the great benefits of digital; the results are always immediate!

Lightning over Junee. Two critical aspects to this exposure:
the shutter speed was in excess of 30s to give me the
best opportunity to capture the intermittent lightning, and an
appeture value large enough (small number remember!) to allow
the light from the lightning through.


What Makes a Memorable Image?

I remember having a discussion, rather heated too if my memory serves me correctly, with another photographer about the merits of an image and what makes it important, memorable or special in any way to the intended viewer.

He was always critical of the technical elements of an image and judged the quality accordingly. He was very firmly of the opinion that if it wasn't tack sharp, exposed beautifully (read more on exposures here) and composed imaginatively then it couldn't be a good image.

I would agree that for some images this is true; art images, landscapes, still lifes etc. But given that the overwhelming number of image "transactions" are between photographers and clients (portraits and special events such as weddings, christenings, birthdays, etc) for me at least a good image, a memorable image is all about the memory and the emotion that it conveys and invokes.

Quite a lot of people in the past have shown me a photo and asked for my opinion. I used to give a nice critique (it's nicely exposed, interesting subject matter, it helps if Aunty Beryl is looking toward the camera) but after pondering this now for some time, I think this was the wrong way to go about it.

Now, when someone is after my opinion (and funilly enough it isn't as common an occurence!) I ask them, simply, what the photo means to them. Sometimes a smile spreads across their face as the reminisce, sometimes they stare blankly and have no feeling toward it. It is that reaction that I think is important.

What are your thoughts? What makes an image special to you, makes it memorable? I'd really like to get a feel for whether I'm just blowing hot air in a touchy feely group hug way, or wheather there's something to it.

Technically a fairly poor image: crooked horizon, boring sky,
slightly out of focus. But the emotion conveyed is simply
so powerful and as it turned out, sufficiently powerful
to help a nation win a war...