Showing posts with label portraiture. Show all posts

Sunday, February 19, 2012

#7 - 52 Weeks Lit Up

A bit of a change this week. All my strobe gear had to be packed away to make room for the visiting in-laws so I tried to keep things to a single speedlight.

Years ago, when I first discovered off-camera lighting, I'd seen a style that is great for lighting up glass items in a product type shot.

Now back then, with the limit of a tethered flash, I couldn't really push the speedlight to where I wanted to. But that's all history now.

So the premise of the shot is to create a strongly back-lit environment. By utilising backlighting with glass objects you can just about eliminate those ugly reflections that plague front-lit images. The back lighting also does a great job of highliting the curvature of the glass structure as the light is reflected at different angles across the curved surface.

This week also saw Valentine's Day come and go and in keeping with this annual excuse for florists and jewelers to make a killing I used my wife's rose bouquet (you didn't actually think I'd be silly enough to not indulge my Valentine) as the main subject matter.

The half full beer was used for setting up and to balance the overwhelmingly soppy theme...


Unfortunately for my background I had to resort to a bit of calico (I ironed it at least!) so the first thing I had to do was completely blow it out to white.

To do this I simply moved the background so that it was 1m or so behind the bottle with the bottle on a table. The speedlight was on a stand under the table point up toward the background and out of view.

You can see how the backlighting really highlights the shape of the bottle and adds depth to the image not to mention the rich colour of the delightful amber nectar!

With the lighting sorted I moved the bottle back to my end of the table (it's important to keep well hydrated on a lazy Sunday) and brought in the flowers...


With the flower buds I moved in for some more abstract types...
And the pick of the bunch, converted to monochrome with a straw tint...
The pick... ISO100, 1/200s, f/11 @ 200mm. Speedlight at 1/8 power


One thing I'd like to see next time is more of a gradient across the background. There's a hint of it in the last image, but I'd like to see it more pronounced and I think the best way to achieve this would be to snoot the speedlight. One fore next time...

Please feel free to leave feedback or to discuss, criticise, question anything I've covered in this or any other blog, subscribe to this blog to make sure you don't miss anything and be sure to visit and 'like' my facebook page and follow me on twitter.

Thanks for reading!!!

Will

Sunday, February 12, 2012

#6 - 52 Weeks Lit Up

On the back of No. 5, I wanted to continue the theme, but move it outside.

This was as simple as the week before with a single speedlite  into an umbrella on a monopod. The hardest thing for this setup was trying to keep Lilly still and occupied!


"I see the light!" ISO 100, 1/200s, f/8 speedlight on 1/2 power
into an umbrella directly above her on a monopod


Given a bit more time I would have like to make more use of the grape vines as a background, but this was taken between vacuuming and mopping of the floors, dinner and ultimately bed!

Please feel free to leave feedback or to discuss, criticise, question anything I've covered in this or any other blog, subscribe to this blog to make sure you don't miss anything and be sure to visit and 'like' my facebook page and follow me on twitter.

Thanks for reading!!!

Will

#5 - 52 Weeks Lit Up

So no doubt you would have worked out that there was no post for last week. Unfortunately the realities of fatherhood, owning a house (and having to work on said house) and full time work simply didn't give me enough time to shoot and write up #5.

However, all that means is you get two this week!

First up is an attempt to replicate the effect of soft, overhead lighting that is pretty popular in the glamour/portrait world. Unfortunately I don't yet have a stand and boom which would of course make this far easier, so instead I had to play around with what I have...

My hypothesis was pretty simple: two strobes, as high up on their stands as they can go pointing directly up into umbrella reflectors either side of the subject (me, just for something different!). This produced ok results, but for mine the lighting was a bit flat and lacked any real punch or drama.

The problem was that I had both lights slightly infront of me meaning there was plenty of overlap and spill stripping any shape from the image.

The remedy? Bring the lights more in-line with me to add more shape to the light and minimise the overlap. It didn't take much, the lights were only moved about 30cm toward me (away from the camera) and this created a better result.

Better, but still flat

Still, it wasn't where I wanted it to be and at this stage I was starting to realise that I would have a hard time of achieving what I had in my mind without a boom. Realising this, my priorities changed to now at least creating a shot with more character whilst sticking as closely as possible to the original idea.

It was pretty simple from here on, just keep moving those lights further and further back to bring more shape and direction into the shot until I eventually found a good compromise.

It was at this point that Nic happened to walk past (you'd think she would have learnt by now!) so I roped her in for a couple of shots, one of which is my pick of the bunch...


The pick of the bunch (romantic I know!) ISO 100, 1/200s, f/18 @75mm


The final details are pretty simple:

Both strobes were pointing directly up on half power and about 0.5m from us.


At the end of it all I did have some images that I was happy with, but they still didn't satisfy what I originally wanted. It'll be a while before I upgrade any of my lighting gear so I'm still going to be searching for a technique to replicate a softbox on a boom and just now one thought is to change the umbrellas to reflectors, really ramp up the output and bounce the light off the ceiling... Maybe next time?

Please feel free to leave feedback or to discuss, criticise, question anything I've covered in this or any other blog, subscribe to this blog to make sure you don't miss anything and be sure to visit and 'like' my facebook page and follow me on twitter.

Thanks for reading!!!

Will

Sunday, January 29, 2012

#4 - 52 Weeks Lit Up

After a couple of days of sweating it out in the backyard I was keen to keep things nice and simple this week and you can't get much more simple than a single, soft light!

There isn't a lot to tell about this setup: softbox, nice coloured wall and a subject.

Trying to keep things simple but interesting...
Bring in the cute factor!
A face that would melt the Arctic!
"Can I let loose Dad?"
"YEEEAAAHHHHH.
Single softbox to camera left on ~ 1/2 power and about 3' from us, ISO100, 1/200s, f/22 @ 113mm. Exposure, contrast, split toning
and vignette in Lightroom 3


Please feel free to leave feedback or to discuss, criticise, question anything I've covered in this or any other blog, subscribe to this blog to make sure you don't miss anything and be sure to visit and 'like' my facebook page and follow me on twitter.

Thanks for reading!!!

Will

Sunday, January 22, 2012

#3 - 52 Weeks Lit Up

This week was all about a hi-key portrait (not of me!!!) and simpicity.

I've been thinking about this all week and it came together quickly with very few adjustments which is to be expected when you're essentially only working with a single light.

To achieve the light, bright hi-key feel I wanted to try out shooting straight into my large softbox. Of course I would need a fill light on my subjects (my beautiful wife and daughter) so to keep with the soft feel I broke out my second, smaller softbox (hence the name) to act as the key fill light.

First set up was with the second box (roughly 3'x2'; the smaller of the two) vertically oreinted and in-front of Nic and Lilly (and ever so slightly to the right so I could still see them). I set the backlight to about 1 stop brighter than the fill light (back light @ 3/4 power, fill @ 1/2) just to make sure I got that white background.

This produced some ok results, but because the light had to be just right of centre it introduced an uneven look to the shot with some slightly darker shadows on the left of Nic and Lilly's faces on brighter highlights and the right (relative to the camera).

To remedy this I moved my fill light to centre over the two of them rotated it so it was now horizontally oriented and above them and upped the fill light a little to about 2/3 of a stop less than the backlight.

This produced much smoother, softer results; results I was really happy with!

 So with the lighting set-up sorted it was time to grab a few different looks (and later in post some different treatments).


As usual Lilly hammed it up for the camera and that gave me the pick of the lot:

The pick of the lot: ISO100, 1/200s, f/32 @ 70mm

And here is the sketch of the set-up. As I said, simplicity was the aim!

The set up. Backlight (1x1m softbox) @ 3/4 power and fill light
(1x0.6m softbox) @ 2/3 stop less than the backlight 


Please feel free to leave feedback or to discuss, criticise, question anything I've covered in this or any other blog, subscribe to this blog to make sure you don't miss anything and be sure to visit and 'like' my facebook page and follow me on twitter.

Thanks for reading!!!

Will

Monday, January 16, 2012

#2 - 52 Weeks Lit Up

Well I just managed to squeeze in this set up, even if the blog was written this morning! But I'll claim a bit of leeway as we didn't get home until 9pm last night from a very busy weekend following a very busy week (including Lilly's first week at daycare - cue pulled heart-strings!).

So, about the shot...

In the process of spending a very busy weekend away up in the Blue Mountains, we spent a couple of hours visiting our good friends (we had intended to head out and shoot some engagement shots, but the beautiful mid-summer Mountains weather of 14C, mist and rain put paid to that idea). Now Josh is an absolute Pearl Jam tragic and an even bigger Eddie Vedder - as a soloist - tragic (and I have to say I'm a pretty big fan too) and he took great delight in putting on an Eddie Vedder DVD so we could have our tea and chat to the dulcet tones of Society, Guarantee, etc.

So this shot was inspired by that fantastic musician. I have also been teaching myself to play the guitar since receiving one for my birthday last year so I thought I'd include that in the shot and spare all of you from another classic self-portrait of my mug!

Ok; the details:

I wanted to create a shot that mimicked a relaxed concert feel of just a muso and his (I'd say "or her", but with the amount of hair on my arms we're not fooling anyone...) guitar and the most important thing to get right was the warm key light and the overall low-key feel.

But first a note on the composition. As I said, I wanted to spare you guys from another shot of my mug, and wanted to focus on the guitar. I sat on a chair and positioned the camera so it was at about 3 o'clock, pointing at my right shoulder with the neck and head of the guitar still in frame, but leading away from the camera. At first I would try a large appeture to really try and use focus to isolate the guitar and my right hand, but as it would turn out I just couldn't knock enough light down for that...

The key light: this took the form of my speedlight with a yellowy/orange diffuser on a stand set to 1/4 power, infront of and to my left. Next thing I wanted to do was create a rim light come back light so I set up one of my strobes with the umbrella reflector behind me and to my left and set it to minimum power. The last light was another umbrella'd strobe infront of and to my right - just beside the camera - to fill the shadows cast by the speedlight, again set to minimum power.

As I mentioned, I want to use a large appeture to really draw attention to the guitar and to create some nice soft highlights on the pegs and head, but I just couldn't knock enough light down to use such a large appeture...
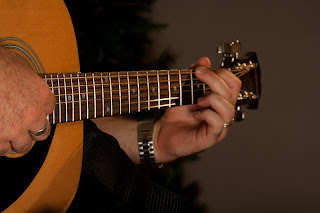
The two strobes are completely dominating the scene and
the key light is lost...


As you can see in the photo, there is simply no atmosphere with this shot. The lighting is too flat and there is no direction.

In attempting to bring down the light I did try one trick that I had read about a few weeks ago.

Now this does affect how your light behaves, and it's advisable that you turn off your modelling lamp to avoid melting umbrellas or smouldering umbrellas. All you do is collaps the umbrella to a degree (play around with the effect) and this reduces the size of the light source, but also the amount of light coming out. I ended up doing this to both umbrellas so I could maintain useable appeture. (The de-decorated Christmas tree was also removed!).

I also played around with turning the front strobe off, but as you can see in the next image, although better,  overall it's still a little too bright and the back light is certainly too dominating.

With limited room, the only possible way to generate the low-key image I was after was to stop down the lens and while this would increase my depth of field and reduce the focus feel I wanted, it was the better compromise.

By this stage I was getting the key light looking how I wanted
it to, but that backlight was just too strong... Front strobe is
turned off.
Another aspect of the shot which I haven't yet mentioned is the difference in temperature of the two light sources.

A very common practice in stage lighting is to use coloured gels over the back lights, I guess to add some interest and a bit of excitement to the whole experience. Because I don't yet have any gels (nor the means at 11pm to create my own) I had to rely on warming up the speedlight with an orange diffuser so that the strobes would appear to be cooler and thus have a blue cast to them.


With the lighting balance out, the warmth pretty much how I wanted it and the low key feel, the final image delivered what I had set out to create...
The final image. ISO100, 1/200s, f/16, ~100mm
And here is the sketch; I have made leaps and bounds in the advancement of my set-up sketches (although they didn't have a guitar playing subject)...

Ta-daaaaa
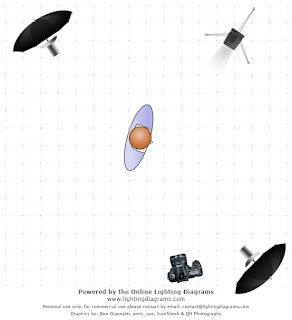
Lighting set up. Note that this diagram shows both umbrellas fully open when in reality I had both collapsed to the point where they resembled snoots. Front strobe (beside the camera) was on minimum power, rear strobe was on 1/3 power and the speedlight was on full power. 

Please feel free to leave feedback or to discuss, criticise, question anything I've covered in this or any other blog, subscribe to this blog to make sure you don't miss anything and be sure to visit and 'like' my facebook page and follow me on twitter.

Thanks for reading!!!

Will

Sunday, January 8, 2012

#1 - 52 Weeks Lit Up

So, this is the first lighting set up of my 52 week project!

Firstly, a bit about the type of image I wanted to portray:

I thought I'd try and replicate something of a theatrical lighting feel, you know as a welcome to the project. What screams theatrical lighting to me is low source light, pointing up at the subject. The lighting has to be relatively soft, but isolated to the subject.

First thing I did was set up my softbox (1mx1m roughly) so its bottom edge was on the ground and angled up toward me. In an attempt to keep the background as dark as possible (keeping in mind it will have a coupl of lights pointing almost directly at it) I went with a small appeture (big number). I screened off the top of the softbox to really bolster that angled up light and put it on full power.

Now the old theatre lights originated as lamps on the leading edge of the stage, so to mimmick this and create more than one catchlight low down in the eyes, I placed a screen down the centre of the softbox.

Single softbox infront and below with screen down the center
and across the top.
Not bad. Not good either. The shadows are simply too pronounced for my liking and with no light coming in from above my hair has completely disappeared (well more so than at the current rate!).

The next step was to introduce a light above me to get some detail on my hair and to soften those shadows. This came in the form of a strobe into a 36" umbrella. (Oh and a change of clothing, I take my work very seriously!). Power was set to 2/3 so as to not completely light up those shadows.

Aforementioned strobe below and now an umbrella above.
Unfortunately I couldn't get the detail on my hair without spilling too much light onto the background, but it has certainly softened those shadows.

So, how to separate me from the background and provide that little bit of detail? Answer: a hairlight with a homemade snoot. I rigged up my speedlight on a tall stand and placed it behind and to my left (camera right) with a snoot (a snoot is light modifier usually in the shape of a long conical piece of plastic. This creates a directional light and minimises light spilling onto areas you don't want lit.

Keeping in mind the speedlight was going to be competing with mains power strobes I bumped it straight up to full power and let rip...

I didn't give that little speedlight enough credit! Way to bright
for the look I was after.
Hmm those speedlights certainly pack a punch! Too much light and if you look closely the hairlight was just spilling onto the end of my nose - something to keep an eye out for as it creates a rather prominant and unflattering highlight.

After powering down the speedlight it is evident that its
aim is still a little off...
After a few more tweaks of the lights (moving the heads slightly) I was finally happy with how it looked on the LCD screen.

The final shot. 
Final settings were:
1/200s @ f/22, 70mm. Softbox, full power infront and below with the top half and center masked out. Umbrella infront and above 2/3 power. Snooted (I love that word...) speedlight above, behind and too camera's left on 1/4 power.

And my paltry attempt at a sketch (I promise these will definitely get better!):

In hindsight I still don't think there's enough separation between the background and me. To overcome this I could have eased up and gone for a wider snoot that would have allowed a bit more spread to the light from the speedlight. I also would have bumped the the speedlight up a little more just to add a bit more light over the top of my head and my shoulders.

What are your thoughts? Any suggestions to improve this shot? I'd love to hear some feedback on this particular set-up, but also on the project as a whole.

Make sure to visit and 'like' my FB page at (Will Barton Photography) to keep up to date with all my work and blog and you can follow me on Twitter: @willb_photos.

Thursday, January 5, 2012

2012 Packages, Prices and Specials!

In welcoming in the new year I've put together my first ever packages and rates for portraiture and corporate work. It has taken me a couple of days to put these together to make them as affordable as possible.

You can find the packages and prices under it's own tab (here).

To herald in this new chapter of my photography, for a limited time I'm offering a 25% discount on any portrait or corporate package. To redeem this discount all you need to do is visit my Facebook page (Will Barton Photography), print out the coupon and book a package for either January or February!